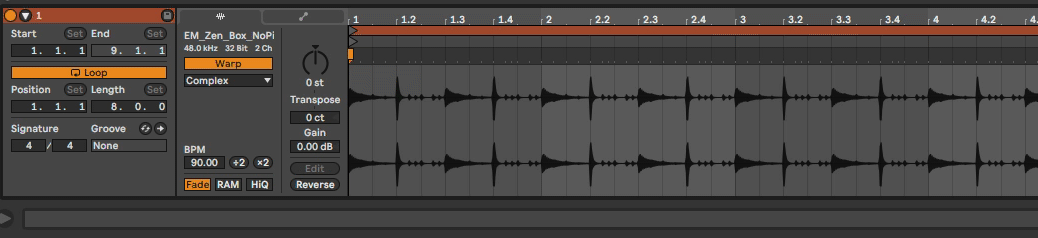
Pretty much exactly three years after Ableton’s last major version-release, Ableton Live 10, our all favourite Digital Audio Workstation-creators now delight the community with the announcement of Ableton Live 11. A few days ago the public beta-phase has started, I had a chance to check out and work with the new software for a couple of weeks already. And folks, I could not be more excited! In this blog post I will highlight my favourite new feature and shine some light on a few more very fine changes, overhauls and workflows.
This is by no means a full review of Ableton Live 11, but more of an introduction to a couple of long awaited features. So let’s dive right into it!
Over the years the Abletons in Berlin have achieved to get many producers and musicans to switch to their platform. Still, for a large group amongst artists, especially those, who produce their music in a more classical way, i.e. recording vocalists and analog instruments, such as real drums, guitars, string sections etc., it was lacking of certain possibilities, that other DAWs were offering for a long time.
I, as a drummer and vocalist was one of them. Whenever I needed to record drums, I felt forced to either heavily compromise or switch to another software (such as Cubase or the good old ProTools) for these tasks. The magic word is comping – and now we have exactly that in Ableton Live 11!
What is comping?
„Comping“ stands for the possibility to record different takes within a looped segment of a song, to then being presented those different takes in a visual overview and the ability to choose parts of those recordings and combine them to that one „perfect take“.
Let’s say, you are recording vocals for a song. With Live 11, all you have to do, is set your loop length in Live’s arrangement view (for example over the lenght of „verse 1“) and start recording in a cycle. Whenever a „new round“ has been recorded, Live 11 will automatically add a new lane containing the last take underneath the original track. To make those evolving lanes visible, you need to click on the track header on the right and either right-click and choose „Show Take Lanes“ or use the shortcut „alt-command-u“. If you do so before you start recording, you can see the take lanes being created on the fly. The lanes are renameable.
When finished with the recording, you can listen to all the individual takes one by one by pressing the little loudspeaker symbol found on each lane. From here you can switch to draw-mode (shortcut „b“) and use the pencil to select your favourite parts of the performance by simply highlighting them. Alternatively, you can highlight the part with the mouse (not in draw mode) and press „Enter“. The result that you create by selecting and combining the segments will be displayed in the top-lane. Automatic and editable fades are applied to cossfade between the cuts to prevent unwanted clicks and pops.

Remember that the size of the chunks of audio you can select depends on the current grid size. To be able to freely select a grid-independent-sized part of a take, you need to turn the grid off by right clicking into the arrangement. When you finally have comped your perfect take, you can close the lanes again and will be left with with one clean track – your comped vocal track!
Comping also works on MIDI tracks.
It’s pretty much the same workflow when you are comping on a MIDI track, so just jam away on your MIDI-drums, bass-synth, your lead solo or whatever you are recording with MIDI and then comp your take.

Apart from the „classical way“ of comping, huge creative possibilities for sounddesign, glitchy sounds etc. are coming up when creating new take lanes (right click / insert take lane“ / „alt – shift -t“ and then mixing up and combining parts by comping them together. Awesomeness!!
Combine comping with linked tracks.
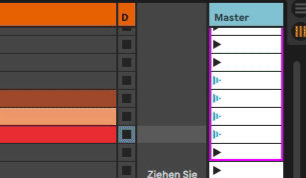
If you record a multi-microphoned instrument, such as a guitar with two or three mics placed on the amp or a full drumkit – which can use up a much larger number of microphon-inputs – things can get complicated in terms of workflow, but even more regarding phase issues.
Therefore, Live 11 introduces its brandnew „link tracks“-feature: By selecting the respective tracks (for example all tracks that represent the drumkit-signals) and right click on the track headers to select „Link Tracks“, all drum signals are linked, connected, grouped together – whatever you want to call it – to be simultaniously edited. (A little icon is shown on the header of every linked track.) This regards actions such as creating or editing fades, transpose all linked signals etc., but foremost (at least for me…), the link-tracks-feature enables multitrack comping. That means, every edit done on any track (f.e. kick, snare, overheads etc.) is processed throughout all linked tracks – and they remain phase correct!

Comping and Multi-mic editing the easy, classic way, – finally in Ableton Live 11.
One happy drummer & producer here!
Follow Actions: Overhauled & finally available for scenes!
As someone who builds Live sets for performances on stage, prefering using Live’s session view, Follow Actions are a fantastic tool to automate a show-order, effects etc. – apart from all other creative possibilities they can provide. In Live 11 we finally get „Follow Actions for scenes!
Before L11 one could built a „hack“ utilising a virtual MIDI port (such as IAC Driver on a Mac or Midiyoke on PC) to MIDI-map dedicated clips to the „fire scene buttons“. Alternatively and more convenient, a nice Maxforlive solution had been available for a while now („Follow“ by Isotonic Studios) to have this feature available. Luckily, no need for all that anymore, since Live 11 does provide Follow Actions for scenes now:
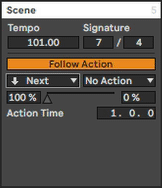
 By expanding the Master section to the left, you can see that every scene has it’s own dedicated number now, and next to those, slots for BPM values and time signatures become visible. All you need to do is determine the desired tempo and metrum for each scene in those slots.
Whenever you click on a scene, you are presented with a dedicated „Scene“-window down in the clip view (alt-command-l or double click on a scene to open that window). Here you will find the same editable parameters again (tempo & time signature) as well as an Follow Action -toggle-button, which needs to be clicked in order to make the individual action active. If a scene is activated for a Follow Action, the appearance of the respective fire scene button changes. The „Scene“-window has a new, more transparent look, which makes it more pleasant to tweak the usual Clip Follow Action parameters, such as probability and Action Time. Also, one new action has been added to the concept: „Jump“, which allows to jump to specific scene, since now they are numbered. Very helpfull, love it!
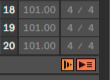
Next to the „Back to Arrangement“-button in the master section we now have a global Follow Action activation button, which, when not turned on, hinders any Follow Actions (scenes or clips) to be executed, independent of their individual status. When turned on, it activates all individually activated Follow Actions.
Speaking of Clip’s Follow Actions:
Yes, Clip’s Follow Actions also recieved an overhaul. The whole clip view section in Live 11 has a different, more userfriendly look, as I find.
Click on the little arrow to make the Follow Actions-tab visible, and you are presented with the new, improved FA window. As descibed regarding scene’s Follow Actions, each clip also needs to have its respectable Follow Actions-button activated in order to perform the action. The new „Jump“ action is also available here, connected to the scene number, in which the clip lives. Additionally, you find a toggle button named „Linked / Unlinked.
When „Linked“ is chosen, the Follow Action will be executed after the clip has finished playing out its full length; alternatively a new option of multplying rounds of the clip lengh can be dialed in. Again, really nice..
When „Unlinked“ is checked, the time before the action takes place can be dialed in (bar – beats – sixteenth) or, also very convenient, by moving the then appearing little flag inside the clip to the desired unlinked clip length. Lastly, there are two Nudge buttons, backward and forward, which can be used to control a playing clip`s launch time by the note value of global quantisation.
The improvements of the whole Follow Actions concept are really awesome, together with the comping features they are probably my favourite new additions to Live 11.
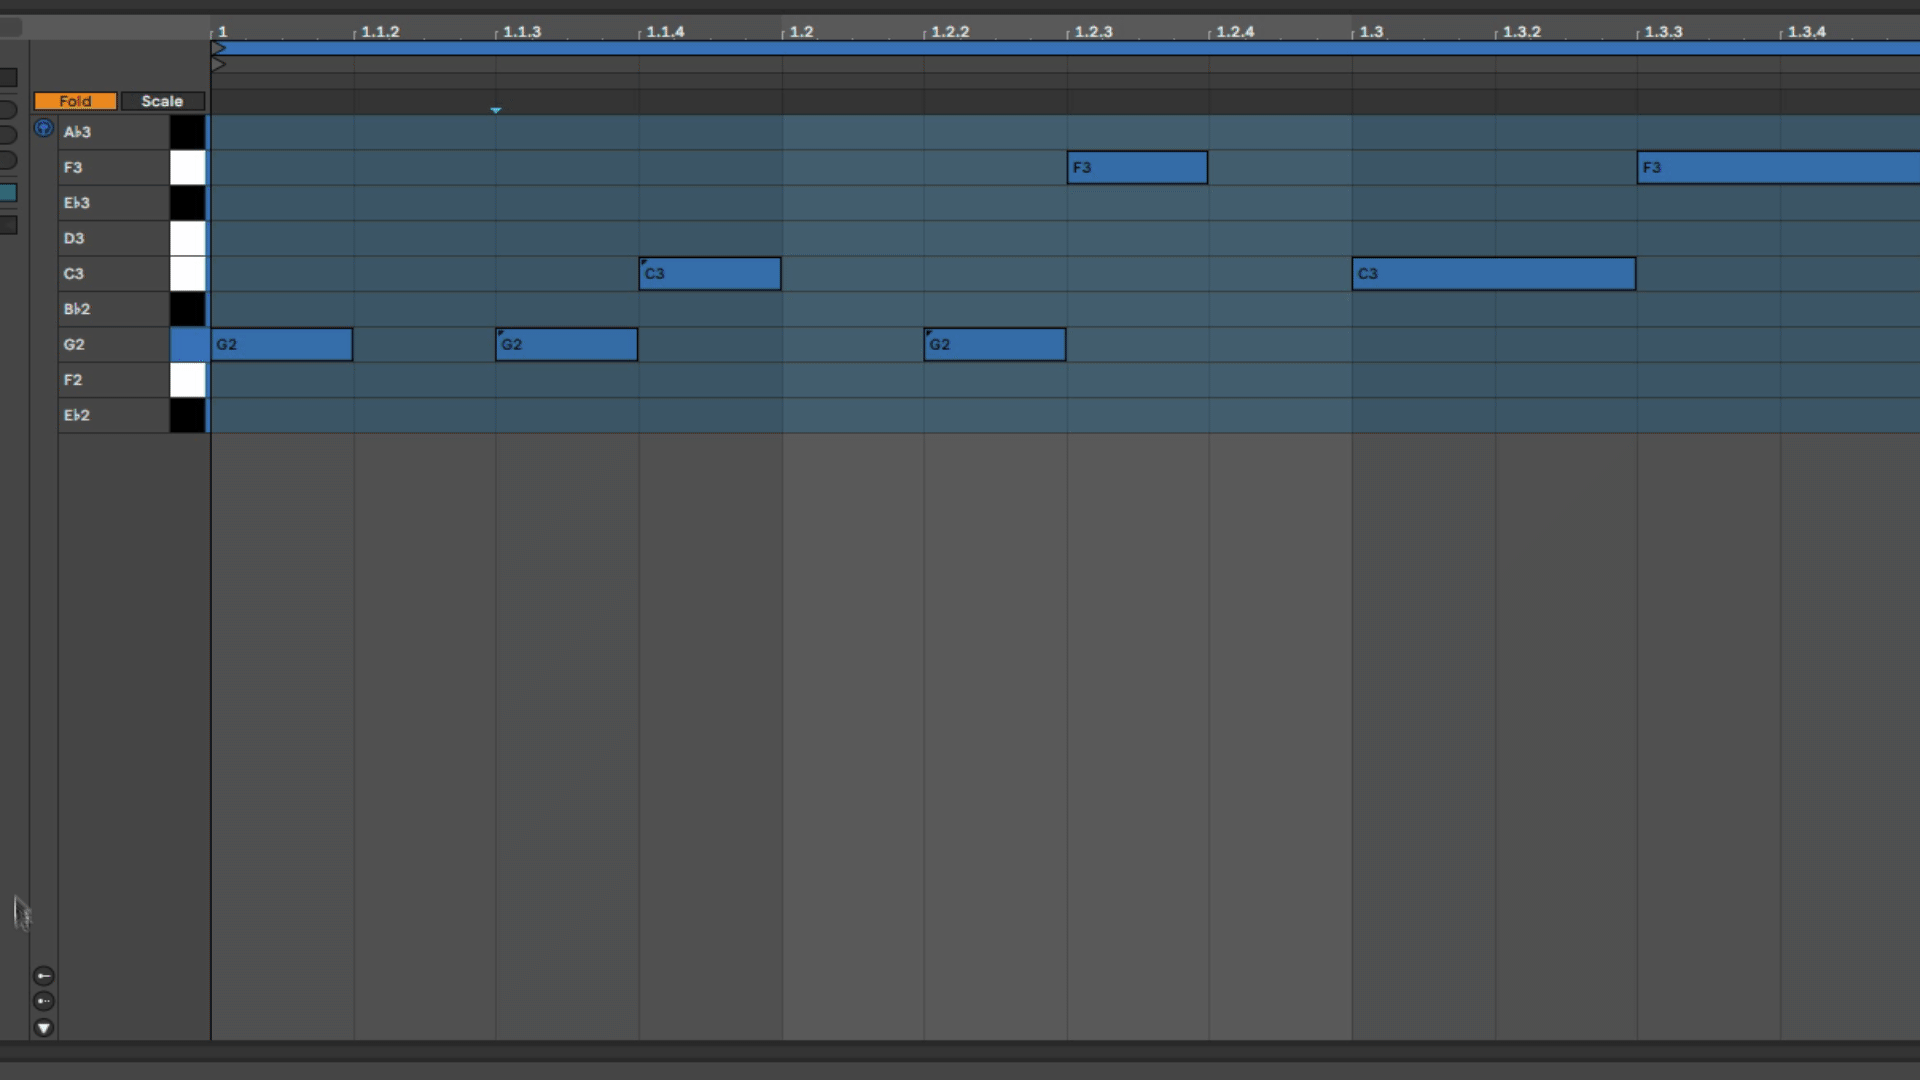
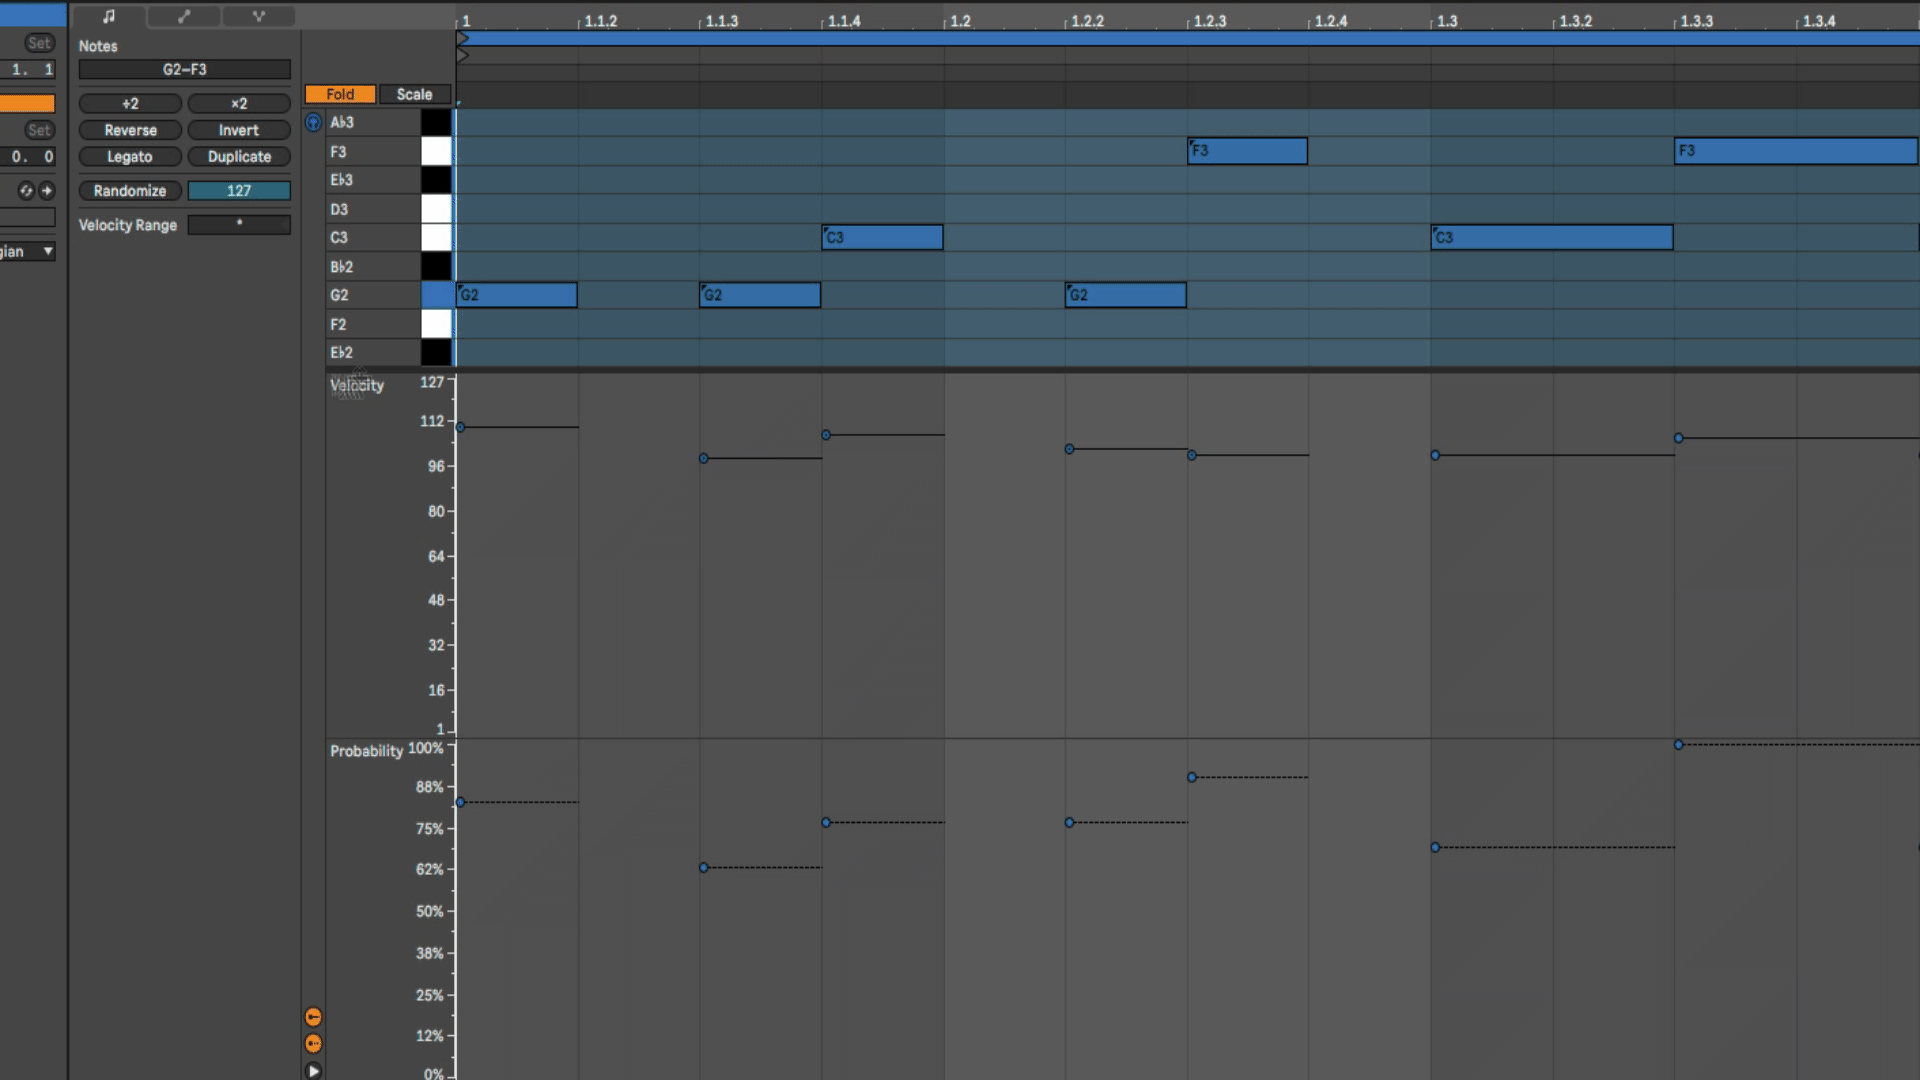
MIDI: Fold to Scale, Velocity, Probability & Ramdomize.
Since I mentioned the changes in clip view, I now would like to adress a couple of more new options regarding MIDI clips, which I really enjoy:
Ableton Push users have loved the „Cannot play a wrong note“ -feature (Scale Button on the Push Controller) for years now, which allows to define a key and scale from Push and then just play notes without ever producing a „wrong“ note. In Live 11 we now have an option (Fold to Scale) in the third tab of the new MIDI clip view, which allows to fold the piano roll down to displaying only notes from the chosen scale. This way you can define your scale and from there draw in any note and it will always fit into the selected scale. Still, this is only an option, of course the whole piano roll is still available. As an improvement, the classic piano roll now highlights those notes in the piano roll, that belong to the chosen (and activated) scale. The classic „Fold“ option, which folds the piano roll down to only notes which currently contain MIDI notes, is still available.
The combination of these three piano roll-views gives us a great deal of freedom, transparency and assistance, no matter how firm we are in music theory.

The MIDI Velocity-Editor has also recieved a make up. The handles, which each represent one MIDI note, are now layouted horizontally, mirroring the length of each note. This makes editing the values and also editing the velocity range of each note (hold „command“ and click drag) much more convenient and visually transparent.

Another very interesting idea is the brandnew MIDI Probabilty-Editor, found in the Expression Editor Lane under the Note Tab. Both editors (Velocity and Probability) are made visible by checking their new, dedicated „Show / Hide“-buttons.
As the name suggests, in this new editor we can define a percentage of probabilty for each individual note to be played out. A supernice tool to create unexpected variations of a given idea, bring life to drum pattern (for example broken HiHat figures) or whatever one could come up with.
Together with the also brandnew „Randomize“-button under the Note Tab, which can target the data in the Velocity Editor as well as in the Probability Editor, endless and inspirational results are just one click away.
These are only a few of many great new features inside Ableton Live 11, which are amongst my very favourites for now, but there is so much more:
Some really exciting new devices, for example: The crazy „Spectral Resonator“ and „Spectral Time“, a new Hybrid Reverb (Convolutiuon & Algorhythmic Reverb -combo), or the overhauled Redux, which now- amongst other improvements – has a dry/wet control.
Also, there is MPE-support (MIDI Polyphonic Expression) for Live’s instruments Simpler, Sampler and Wavetable as well as for selected third party plugins. Racks & macros have been improved, so has the browser. So much to explore and to get creative with.
For me personally, this new version of Ableton Live is a true gamechanger, defining Ableton Live as a true “complete DAW”. I enjoy it to the fullest and can only encourage you to have a close look.
Stay happy & healthy, make music and enjoy!
Comping and all other discussed features are available for all Ableton Live 11 users,
from Live Intro to Live Standard and to Live Suite.
* Note: Ableton Live 11 is still in beta at the time of this blogpost, features may differ in detail at final release.